Testing your solar panels is an important step in determining the output of your panels. Testing is also recommended so that you can be sure that the solar cells are working properly before they are installed.
No matter whether you are a beginner or an expert, learning how to test a solar panel with a multimeter streamlines the process so that it goes smoothly.
How efficient your solar panel is and how much power it produces will vary based on different factors, including the number of hours of direct sunlight, the direction the solar panels are facing, the outside temperature, geographic location, and more.
Testing your solar panels gives you an accurate reading of the amount of solar power being generated. An accurate reading will tell you if you should reposition your current panels or install more to ensure they are performing optimally and generating enough power.
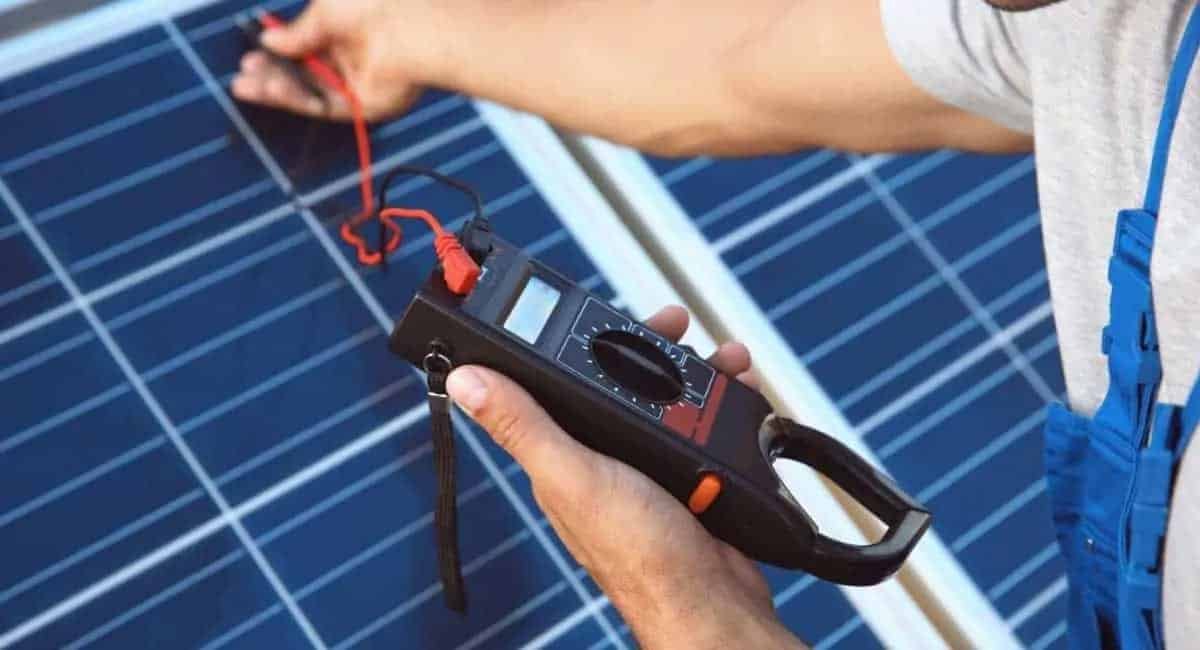
The best tool to use for solar panel testing is a multimeter.
What Is a Multimeter?
A multimeter is a tool used to measure electrical values and troubleshoot electrical problems. Multimeters can use both analog and digital circuits. Digital multimeters are often abbreviated DMM or DVOM. A digital multimeter is easier to read than an analog multimeter, which uses a needle instead of a number on a digital display.

There are all different types of multimeters. A digital multimeter can be auto-ranging, clamp, or fluke. Auto-ranging multimeters are ideal for beginners because they have fewer controls.
Clamp multimeters can only measure amperes unless you use probes to measure the voltage as well. Fluke multimeters tend to be the most complex but they can measure voltage, frequency, resistance, pressure, humidity, and more.
When using a multimeter to assess your solar system, there are three electrical values, or concepts, that you will want to familiarize yourself with: voltage, ampere, and wattage.
In terms of solar power, voltage is the pressure expended by the electrons on the conducting material or the power at which the electrons pass through the electrical system.
The second concept, ampere, refers to the number of electrons passing through the system, otherwise known as the electric current of the circuit. The third is wattage, or the power produced by the voltage and amperes.

When purchasing a solar panel, you might have noticed the panel’s power rating. This rating is provided by the manufacturer and tells you how much power the solar panel is capable of producing in perfect conditions.
However, it is far more likely that your solar panels will be exposed to less than ideal conditions for the majority of each day.
You should also keep in mind that solar panels tend to wear down over time. You can expect the power output of your panels to reduce by 0.3% to 0.8% every year.
How To Test a Solar Panel With a Multimeter: Step by Step Guide
Begin by Noting the Power Rating of Your Solar Cells
When testing your solar panel, the first thing you will want to do is take note of your solar panel’s power rating. A power rating is determined by a laboratory test in which the panel is exposed to simulated sunlight at a constant temperature.
The power rating will give you an idea of the performance you can expect from the panel in ideal conditions. However, because it is nearly impossible to maintain ideal conditions around the clock, your panel will likely produce less power than the rating suggests.

This is another reason why it’s important to test its performance. Fortunately, with a multimeter, the testing process is relatively straightforward, even for beginners. T
here are just a few steps required to test the amperage and voltage, then you can plug those readings into a simple calculation to determine the wattage or output. The testing process is pretty similar for amps and volts and can be done with the same device!
Step 1: Prepare Your Panel
For accurate solar panel testing, place each module in direct sunlight. If possible, avoid testing on a cloudy or overcast day. Be sure to clean the surface of your panels by removing any dust from the surface that would otherwise cause false readings.
Step 2: Locate Components
Find the junction/converter box on your solar panel. On most solar panels, this box is on the back of the panel. Be sure to remove the cover from the box if there is one.
Next, locate the positive and negative leads. Not all leads look the same — some leads have bare wires at the end and others have a quick-connect plug. Bare wires will have black and red wires.

On a quick-connect plug, the positive lead is the female part, or the part that doesn’t have an exposed prong, and the negative lead is the male part or the part with the exposed prong.
Step 3: Set Your Multimeter
Set your digital multimeter to read DC power or DC volts then set it to the highest setting possible for voltage. Regardless of the manufacturer’s rating, you want to use the highest possible voltage setting so that you can get a proper reading of the voltage.
Step 4: Get A Reading
Your multimeter has two probes: one black probe and one red probe. At the end of each colored cable, you’ll see a metal end. You can get alligator clips that will attach to the surface if you would prefer a more hands-free option.
Connect the black probe to the COM port on the multimeter and the red probe to the V/Ω/mA port. Touch the black probe to the negative terminal, or the black lead, on the panel and the red probe to the positive terminal, or the red lead. To make it easier, remember red to red and black to black.
Note the number on your digital multimeter’s display, keeping in mind that you might not get a whole-number reading. Once you make a note of the voltage reading, turn your multimeter off before removing the probes to disconnect it from your solar panel.
Keep in mind that if your solar panels are new, you can expect a strong reading, but if your panels have been used before then the reading will likely be lower.
A new solar panel tested in ideal sunlight conditions should have a voltage pretty close to the voltage rating of the solar panel when it was purchased.
How To Test the Electric Current or Solar Panel Amperage
Step 1: Set Your Multimeter
With your solar panel already prepped and the components located, begin by setting your multimeter to the amps setting to determine the direct current of your panel. Make sure to set the maximum amperage sensitivity higher than the amperage rating of your panel to avoid blowing a fuse.

Step 2: Get a Reading
Just as you did when testing the voltage, touch the black probe to the negative terminal, or the black lead, on the panel and the red probe to the positive terminal, or the red lead. Remember red to red and black to black. Make a note of the number of the display — that’s the amp output!
How To Find the Solar Panel Output
Once you have your solar panel’s current and voltage, a quick calculation is all it takes to find the power output. Simply multiply the volts by the amps to get the watts. The equation will look like this:
Volts x Amps = Watts
When you plug your readings into the equation above, you will find the power output of your panel.
However, because the power output of your panel is probably less than its rated power, you might want to determine the efficiency of your solar panel.
How To Determine a Solar Panel’s Efficiency
While it isn’t necessary to determine the efficiency of your solar panels, it can be useful in terms of knowing what to expect from your solar panel. Same with solar panel sizes and wattage.
To determine the ideal efficiency of your solar panel, you need to know the incident radiation flux (IRF) in your location. The IRF is the amount of bright sunlight that hits the earth’s surface. A great source for this information is the Global Solar Atlas.
Once you have the IRF value of your area, multiply that value (in watts per square meter) by the total surface area of your solar panel (in square meters). For example, if you have a 1 sqm panel and your local IRF is 2,000 watts/sqm, you’ll get 2,000 watts.
Then, take your panel’s power rating and divide it by the determined watts value.
For example, if you have a 300-watt solar panel. Forget about the size or how big is a 300-watt solar panel, the panel’s ideal efficiency is 15% or 0.15 (300 watts divided by 2,000 watts).
To determine the operating efficiency of your solar panel, measure the surface temperature of your panel (in Celsius), then subtract 25 degrees Celsius.
For example, if the measured temperature is 40 degrees Celsius, you’ll get a value of 15 degrees Celsius.
Then, multiply 10 degrees Celsius by the Pmax temperature coefficient. The Pmax value is provided by the panel’s manufacturer.
If your solar panel has a Pmax value of minus 0.40% per degrees Celsius, the value will be 4%.
Lastly, subtract that value from the ideal efficiency (15% in our example) to get the operating efficiency (11%).
Common Solar Panel Problems
There’s a good chance you won’t run into any problems testing and using your solar system, but it never hurts to be prepared. As a responsible owner, it is always good to know how to maintain solar panels and troubleshoot minor issues.
Here are the most common solar panel problems and suggestions on how to fix them:
Low Efficiency
If you discover that the efficiency of your solar system is lower than expected, it is likely related to the cells’ conversion of solar energy. It could be that your panels were manufactured with lower efficiency values.
In this case, you would need to consider upgrading your panels. However, your panels’ reduced efficiency could also be the result of one or more factors that are much easier to fix. Take a closer look at any factors that could be contributing to lower module efficiency.
Make sure to clean your panels regularly to keep them free of dirt, dust, and other residues. Ensure the orientation of your panels is optimal based on your location.
Connection Problems or Faulty Wiring
If you suspect a problem with your connections or wiring, look for corroded cables or loose connections. You should be able to easily fix any loose connections, but if you are dealing with corroded cables you will need to bring in a professional to fix the problem for you.
Hot Spots
While solar panels are converting energy from the sun into electricity, they might feel warm to the touch. But, you want to make sure that you avoid any hot spots, as they are especially dangerous for your entire solar system.

Make sure your panels aren’t overheated or overloaded and you shouldn’t have to worry about hot spots.
Conclusion
Testing your solar panels is an important part of utilizing solar power. Unfortunately, many people are completely unaware of the need for testing or are intimidated by the process. By learning how to test a solar panel with a multimeter, you can rest assured that your solar panels are working properly!


